Bonsai Soil
Bonsai Soil

Volumes have been written about bonsai soil. Bonsai artists and growers argue about soil the way hot rodders argue about engine tuning. The truth and reality is, THERE IS NO ONE IDEAL RECIPE FOR BONSAI SOIL. There are some good ideas out there, but climate variations and unavailability of materials make it impossible for one soil recipe to work in all parts of the world.
Let’s Start With the Basics
Potting soil for houseplants or patio plants, in and of itself, does not work. This kind of soil is usually 100% compost, and is designed for people who water infrequently and never add fertilizer. It is also usually designed for tropical plants or fast growing annuals, so the emphasis is on water retention, and maximizing the nutrients in the soil. For a bonsai tree, which has entirely different growth habits, using this kind of soil is a disaster. The soils sold in stores and nurseries as “bonsai soil” are just as bad. They generally use lots of perlite or vermiculite. Either of these materials is fine if used in moderation, but making the entire aggregate component of perlite or vermiculite is like trying to grow the tree in a bed of Styrofoam pellets. If you are going to buy s prepackaged soil for use with bonsai trees, look for cactus mix. Palm tree mix is an even better choice, if it is amended with other materials to improve drainage. We are not going to use potting soil as bonsai soil – but we can use some kinds of potting soil as one of the building blocks for good bonsai soil.

Adapt Your Soil to Your Weather
I have had a lot of self-styled bonsai experts tell me I should be using 100% inorganic soil in my trees. Uh, no, thank you. A few years ago we did an outdoor show in April, and on one of the days the temperature unexpectedly rose to 105 degrees Fahrenheit. Some folks’ trees died that day, but not any of mine. In September, 2010, the mercury hit 113 around here. I watered only once that day and I still did not lose any trees. If you live in Japan, or the Pacific Northwest, or Great Britain, you can use that inorganic mix of akadama, pumice, charcoal, sand, whatever, and pile the fertilizer on top. Do that where I live, and when the next heat wave comes, or the Santa Ana winds blow hot, you’d better be out there with the water hose all day long, or your trees are going to be firewood.
Those bonsai guys who say the soil has to drain straight through immediately? If they live in Seattle, or Southern England, and you live in Phoenix or Las Vegas, don’t listen to them. Think about the weather your plants will experience. If you can, get your soil advice from a bonsai grower who lives near you.
Also consider your tree’s reaction to the weather. A ficus growing in the desert will need a lot of water retention in the soil. A Japanese Black Pine growing in England or the Pacific Northwest will need the maximum drainage possible. Even within your own yard, water consumption is going to vary from tree to tree depending on the species of tree and the location where it is kept. Junipers like full sun, and I have one Juniper that dries out its soil every day, even though I have nearly 40% organic matter in the pot in order to facilitate water retention. On the other hand, I have a Chinese Elm growing in the same mix in a shady location. Sometimes that Chinese Elm goes for a week without needing to be watered.
But this brings in the siting consideration. A lot of experts and bonsai nursery owners keep all their trees under shade cloth, so they can use fast draining soil. Can you keep all your trees under shade cloth? Especially if you have a lot of trees? What is the neighborhood homeowner’s association going to say about that? Or worse, what happens when the cops knock on your door with a search warrant, because they think you are growing something other than bonsai trees?
And what about your own lifestyle? If you are retired and never travel, and your trees are your best friends, and you can water them three times a day when it gets hot, then use the 100% aggregate with fertilizer on top approach. But what if you travel? Do you like to take a romantic weekend with your significant other every so often? Can you trust a friend or relative to come and water everything? And what if your designated watering person has car trouble or gets sick? Your trees may have to go a few days without being watered. Mine can take it. Can yours? Some folks use an automatic drip irrigation system. Those work great, but they do break down occasionally.

Organic vs. Inorganic
Soil materials come in two varieties: Organic and inorganic. Organic matter can consist of many things, but the best for bonsai use is composted tree bark. For inorganic matter, there are many choices. The classic choice is Akadama, a form of fired clay pellet found in Japan. A good alternative is decomposed granite, which does not break down over time. Pumice is another good choice. Coarse sand is also a good inorganic soil component, and one that the Japanese often mix with Akadama. What if you cannot source any of these materials locally? The other choice is diatomite, which can be found as automotive spill absorbent at the NAPA auto parts stores, and can sometimes be found as cat litter. If you decide to use automotive spill absorbent or cat litter, make sure of two things: 1) that it does not have any perfumes, deodorants or chemical additives, and 2) that it does not break down when you water it.
More about that “Bonsai Expert” soil:
Don’t get me wrong. I am not ridiculing or insulting anyone’s expertise in bonsai. There are some bonsai experts out there who are touting a certain soil recipe which consists entirely or almost entirely of inorganic matter, and is made up of varying proportions of decomposed granite, coarse sand, akadama, agricultural pumice, and maybe a little bit of charcoal. And these guys are experts, believe me. They know bonsai the way those guys on cable TV know how to make motorcycles. Have I tried this mix? Yes I have. What were the results? Well imagine if you decided to ride a custom motorcycle or drive a hot rod to work every day. You can do it, but it does demand some changes in your lifestyle. The “expert soil” is the equivalent of a hot rod. Lots of performance, but not much protection from the weather, and not much crash protection.
You can use the “expert soil recipe” if you want, but you are going to have to make some changes to your lifestyle if you do, because using it means you have to pay attention to your trees all the time. The experts don’t care about this because they always have students, acolytes and underlings to care for the trees for them.
My Own Soil Recipe:
My soil recipe is not a hot rod. It is more the equivalent of a high end minivan. It will get you where you need to go, and protect you from calamity. Here it is: 30% Decomposed Granite; 30% agricultural pumice; 10% coarse sand, and 30% organic matter. I use whatever potting soil I find at the “big box” store, as long as the primary ingredients are composted organic matter and there are no water retaining additives.
Okay, I think I found the right ingredients, now what?
First, sift your ingredients through an old metal window screen to remove all the fine particles. Then, mix your ingredients in a bucket. The proportions of the ingredients will vary, with the critical proportion always being the amount of organic matter. Most growers recommend 20% to 30% organic matter for pines and Junipers, and 30% to 40% for broadleaf trees. Once you have your bonsai soil mixed, you can proceed with potting your trees.

Growing Trees With This Soil:
I will freely admit it: Sometimes, I practice “bonsai with training wheels on it.” The organic component in my soil will not hurt the tree. It serves the same function as a padded interior and an airbag in a car. The organic part of the soil is your insurance policy and your crash protection. If you forget to water, it holds a small reserve of water for your tree. If you forget to fertilize, it holds some nutrients. If you follow proper routines, and do everything according to schedule, that little reserve is there if your tree needs it.
read moreBonsai Care
Bonsai Care

Let’s Start With the Basics
If you are reading this page, then it is likely you just purchased a bonsai, or were given one, or inherited one, or adopted one. So let’s start literally from zero. First:
What kind of tree is it?
Fifteen years ago, you would have had to ask someone. Now you can log onto the Web and have the answer in a few minutes. I have seen quite a few folks find a bonsai forum, post a photo and ask the members. This is fine if you can wait for an answer. Unlike a number of other bonsai websites, I have tried to post a photograph of a “real world” bonsai specimen from every species in my collection. I don’t have every possible species used for bonsai covered yet, but I have managed to cover the species of plant most commonly used, so chances are if you look around, you will find something similar to what you have.
Is Your Tree Healthy?
Take a good look at your tree. Does it look healthy? More important, does it look like a bonsai, or has it gotten ragged looking? Are the leaves a healthy green, or are they yellow or brown? Here is the most important question for every bonsai, no matter what it is, or where it came from: WHEN WAS THE LAST TIME YOUR BONSAI WAS REPOTTED? Because bonsais grow in a very small volume of soil, most bonsais will burn the nutrients out of the soil in as little as one growing season. The soil will also eventually compact or “cake up,” impairing drainage and eventually causing root rot. Is your Juniper bonsai turning yellow from the bottom up? Is your Ficus bonsai dropping leaves? Is your Chinese Elm bonsai losing leaves and it is not fall yet? Chances are, you have a soil problem, and root rot. The vast majority of problems with bonsai can be traced back to the soil – either bad soil, or the tree went too long without repotting. THE SOIL IS THE TREE’S LIFELINE. Repotting a bonsai is like changing the oil in your car. It has to be done regularly. Unlike your car, a bonsai can go a year without being repotted. Some can go two years. Let them go any longer than that and you are asking for trouble.
Here’s Some Bad News:
Most bonsais you purchase online or at a “big box” store are mass produced in China, and container shipped around the world. The growers use a peaty soil that retains moisture well, and they glue rocks to the surface to further retain moisture. The do this because the trees are not watered at all during shipping. This practice keeps the tree alive during shipping without it being watered. However, when you, the purchaser brings it home, and starts trying to keep the tree on a regular watering schedule, well, that is usually when the trouble starts. It is almost impossible to keep a bonsai potted in poorly draining soil on a regular watering schedule. This is because how quickly the soil dries out depends on external factors such as the weather and the surrounding temperature. You end up watering too much or not enough, and eventually the tree gets root rot. The tree announces this by getting pale, the leaves turn yellow and drop off, or in the case of a juniper, the tree starts to dry up and die. How do you prevent this? By making sure your tree is potted in good soil.

Now For the Scary Part:
If you have not repotted your bonsai in the past year, TAKE IT OUT OF THE POT AND EXAMINE THE SOIL AND ROOTS. The soil should be granular and well –draining – as in, when you water, you should see water running out the bottom of the pot quickly. This should happen immediately with a small bonsai, and on a count of three with a medium sized tree, and on a count of five with a large one. The tree should not be rootbound. The soil should not be a dry brick, nor should it be a gloppy mess. You should always have some spare bonsai soil available. Even if you have only one or a few trees, you never know when a cat or an opossum will knock one over.
Repotting:
If you are going to prune the tree or shape it, this should be done before repotting. To repot, first break up the soil with a chopstick. If you do not have a chopstick or a root hook, use the center prong on a cultivator, but be careful. If the tree is something other than a Black Pine or an Azalea, you can wash the soil off the roots with a hose. Prune away any overly long roots with a sharp scissors. If the tree has root rot, prune away any dead roots. Either have a new pot available, or wash and clean the existing pot for reuse. Place drainage screens over the drainage holes and wire them into place with bonsai wire. If you do not have bonsai wire, copper electrical wire or steel baling wire will work. Place a layer of soil into the bottom of the pot. Prune the tree’s roots so that there is a ¼” gap between the outside edges of the root mass and the inside edges of the pot. Place the tree back in the pot and wire it into position of necessary. Fill the soil in around the tree’s roots. Make sure not to leave any air pockets in the soil. Water the tree after you repot it, until water runs out the bottom of the pot.
Watering:
Bonsai are supposed to be grown in a loose, fast draining soil mixture, and most are intended to be watered on a daily basis, or at least every second or third day. However, if you are caring for an existing bonsai you bought or were given, observe it carefully to see how well the water drains from the soil. There is nothing worse than leaving a bonsai constantly waterlogged – unless the tree is a Bald Cypress . Never water unless you are sure that the tree needs it. Use a chopstick to probe the soil and check for moisture under the surface.
Fertilizer:
Bonsais need supplemental fertilizer. The small volume of soil they grow in cannot hold enough nutrients to keep them healthy for very long. The rule with fertilizer is, USE IN MODERATION. Overfertilizing will kill a bonsai quickly. There are two kinds of fertilizer: Chemical and organic. Chemical fertilizers work quickly, but also kill quickly if used in excess. Organic fertilizers are easier to use, because the tree will take what nutrients it needs, but they tend to smell, and can attract pests. Whatever you choose, use in small quantities until you know the effect it has on the tree.
Location:
Where you put your tree is just as important as the soil and watering All trees need light and fresh air. While that tree would look beautiful on your coffee table, keeping it there is a really bad idea. If you want to use a bonsai as a table centerpiece, keep it outside on the patio table. While some bonsai are sold as indoor bonsai, “indoors” usually means in a south facing window, or under a really powerful grow light. The vast majority of bonsai do best in a sheltered outdoor location, such as a patio with a lattice cover, and should only be brought indoors to protect them from snow and frost. For purposes of siting, you do need to know what kind of bonsai you have. Pines and Junipers will have different needs from an Azalea or a Ficus.
Pests and Diseases:
Watch your tree carefully. It is pretty easy to tell when a tree gets infested with insects or fungus. Observe what is going on. If you see aphids, or scale insects, or you see a fungus on the leaves, take appropriate action.

Enjoy Your Bonsai!
There are lots of ways to enjoy bonsai. They are beautiful to look at, of course. You can simply sit in your garden and stare at them, and enjoy the peaceful feeling it gives. They also make nice display pieces, either in your yard, or for a temporary indoor display. Bonsai also make wonderful subjects for photography, and you may discover a new hobby photographing your bonsai.
read moreAbout Me
About Me:

I am just a regular guy who grew up in Southern California, and fell in love with bonsai trees at an early age. I saw my first one when I was about seven years old. We lived in Carson, CA, and the local nurseries were owned by Japanese folks. Dad went to one looking for bedding plants, and I saw my first bonsais, and it was love at first sight. I saw more on a trip to San Francisco when I was eleven. From there my love affair took me to the local library, where I checked out and read every book I could find about bonsai — all three of them. One was the second edition of the Sunset bonsai book.
By high school I had my first attempt at bonsai that survived beyond initial repotting – it was a semicascade Prostrata Juniper growing in a wooden training box.
Higher education interrupted my love affair with bonsai for about nine years. Then one Christmas my sister went to a Japanese bonsai nursery and bought me my first real one. That was twenty years ago, and I still have it.
From there, a small collection of bonsais followed me from apartment to apartment, and when I got a place with a yard, the hobby took off.

"Point of Origin."
By the late 1990’s I was doing club demonstrations in Southern California. I had always wanted to do something on the Web, but the right technology did not yet exist. Digital cameras were very primitive, and uploading photos was a very cumbersome process. Video? Forget about it.
A few years ago, a friend showed me Youtube, and the possibility of fitting a bonsai demonstration into a ten minute video format intrigued me. Those early videos were frenzied affairs, shot without the ability to edit, and forced to fit everything into a ten minute time frame.
Over the years we’ve gotten better at it – better cameras, better sound, better lighting, better editing. The goal has always been to invite you, the viewer, into my yard, to show how a regular guy does bonsai.
Regards, Charles M
You can contact me at chasnsx@aol.com.
read moreHow Do I Make My Bonsai Trunk Thicker
How Do I Make My Bonsai Trunk Thicker?

There are several techniques, depending on the variety of bonsai.
Growing in the Ground or in Large Pots
The oldest and commonest technique is to simply thicken the tree in the ground, or in a large pot or tub. Each technique has its advantages. Most trees thicken faster in the ground, because they are able to send roots farther out to seek nourishment, and the longer and thicker the roots, the thicker the trunk base gets. However, this can present a problem when it is time to lift the tree from the ground. If there are no fine roots near the base, and the tree is a variety that is sensitive to root disturbance (or just not in the habit of growing new roots from the cut off stubs of the thick ones).
There is also the problem of having ground to thicken your trees in. If you are a homeowner, then chances are, you have some yard space somewhere. The next question is, does this space meet the sun and water requirements of the trees you are trying to thicken? How is the soil? Is it fertile enough, and does it drain well enough?
Rather than create a specific “thickening farm” in your yard, it is better to just use plants that are amenable to bonsai in your landscaping. Then after a few years, you can pull the larger and thicker tree, make a bonsai out of it, and replace it with another one.
The alternative is to thicken your tree in an oversize bonsai pot or a large tub. Your tree will not thicken as fast with this method, and you will have to pay closer attention to water and fertilizer. You will also need to do yearly soil changes in order to maintain good growth. However, this method does have the advantage of giving you control over the root system, and maintaining mass of fine roots, making it easier to transition the tree into or back into a bonsai pot when the trunk is thick enough to suit you.
The biggest disadvantage of the above method is, unless you are using something really fast growing like a Ficus or a Chinese Elm, it can take years. The above method is obviously not for those folks who have one bonsai, or just a few, and are looking for an “instant enhancement” to appearance.
Sacrifice Branches:
The best way to thicken a trunk base, in conjunction with the above technique, is to run one or more sacrifice branches. A sacrifice branch is a branch that is allowed to get as long and as thick as possible, and its sole purpose is to cause the trunk to thicken. When the trunk reaches the desired thickness, the sacrifice branch is cut off. This technique is most often used with Pines, but can also be used with other species. Typically you run a sacrifice branch off the top of the tree in order to thicken the entire trunk, and you run a sacrifice branch off the base to thicken just the base. Below are photos of sacrifice branches on Pine bonsai. One note about running sacrifice branches from the base on a Pine: Pines are apically dominant, which means that they put all their growth energy into the top of the tree, often at the expense of lower branches. This means that you have to go out of your way to persuade the tree to put energy into the sacrifice branch. One extreme technique to do this is to train a base sacrifice branch upwards so that it gets plenty of light, and so that the tree sends plenty of sap to the top of it. You can even train the sacrifice branch to be bigger and taller than the rest of the tree, resulting in a really massive trunk base.

This Pine has a sacrifice branch at the apex

The branch at lower left is a sacrifice branch
Tourniquet:
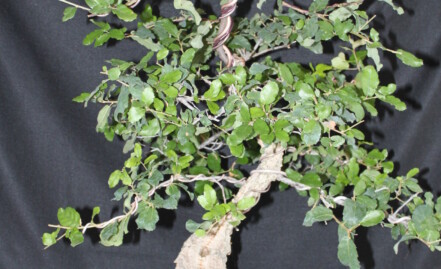
There is an old method that the Japanese use, where a wire tourniquet is placed around the base of a tree in order to induce a swelling. You will get results quickly, usually in one growing season. This is especially true if you apply this to fast growing material. Below is a photo of a Chinese Elm which was subjected to this method sometime in the past. The effect on the trunk is noticeable, but so is the scar left by the tourniquet. This method causes a thickening at the base only, and is most useful to create a tapered trunk in a species that does not naturally taper, such as the Chinese Elm. Use this method with caution, as it leaves a permanent scar.
Splitting the Trunk From the Base
This is one method which produces instant results. It is also a method that should only be used on trees which will tolerate and heal around traumatic injuries, such as Junipers, Elms, Boxwood, and most varieties of Ficus. The technique is exactly what it sounds like: You pull the tree out of the pot (Only do this at the beginning of the growing season), wash all the soil off the roots, and split the trunk from the bottom up with a wood chisel, a saw, or a rotary tool, or a trunk splitter. Once the split is made, you may need to use wire or wedges to hold it apart. Then repot the tree and let it heal. Using an oversize pot should speed the healing process. Below is a photo of a Procumbens Juniper which was subjected to this technique in order to cure a reverse taper at the trunk base. This is a very slow growing variety of Juniper, and it has taken nearly fifteen years for it to heal to the state it is shown in here. However, splitting the trunk did produce an instant visual improvement in the tree when it was done.

Intentional Scarring:
A Pine or Juniper trunk can also be thickened by using a knife to carve vertical lines through the bark down to the sap layer. This produces an injury which the tree heals, and this produces scar tissue, which thickens the trunk. The Juniper bonsai shown below had a reverse taper at mid trunk which was cured in this manner. This tree required only a single scarring, which was repeated once in a two year period, to cure the reverse taper. You can thicken a trunk at the base by carving three or four scars around the circumference of the trunk and letting them heal.

Now For Some Other Techniques:
These other techniques have been used by some prominent Japanese bonsai Masters. However, they can be risky and dangerous, so use them with caution:
Pounding on the base of the tree with a Hammer: The author has not tried this, and suggests only using this on a tree that you feel you can afford to lose.
Drilling holes in the base of the tree: This one was used by some Japanese masters, and based on photographic evidence, appears to work pretty well. In the photos the author saw, the work was done on a Japanese White Pine. One note: This technique may be problematic on a Black Pine, because it is likely to leave some interesting looking scars. White Pines have smooth bark, and scarring is likely not to be noticeable on them for that reason. This might be a good technique for Junipers – it should work similarly to scoring the trunk, except to produce a localized thickening around the drill site.
read more